Doors, Switches and Cutscene
For our third Gameplay Programming task, we have to create a door and switch system, with a cutscene to play when the door is opening. Here are the aims and objectives:
I have split this task into three different sub-tasks to focus on: door, switch and cutscene. The door and switch will be relatively simple to implement, I will trigger animations to open the door and press the switch. The cutscene will be harder, there will need to be multiple states: positioning the player, pressing the button, moving to the door, opening the door and returning control to the player. My Character Controller already has a function to stop all player movement, so I can call this at the start of the cutscene to stop the player. Our given example for this task is Legend of Zelda: Breath of the Wild, showing the player activating the shrine and the door opening. The complex animations and models I will not be looking to implement, however my system should be able to use any animation put onto it.
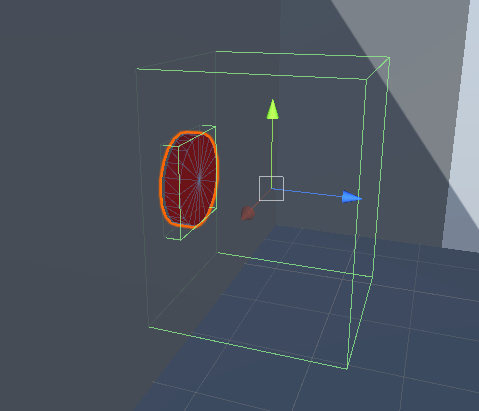
Doors
The door will need to be opened and closed, by using an Animator Controller in Unity I can setup the animations to open and close by changing a parameter, and the animation clip can be changed out to any animation and it will still work. So, to get started I setup a basic door with an Animation Controller on it that looks like this:
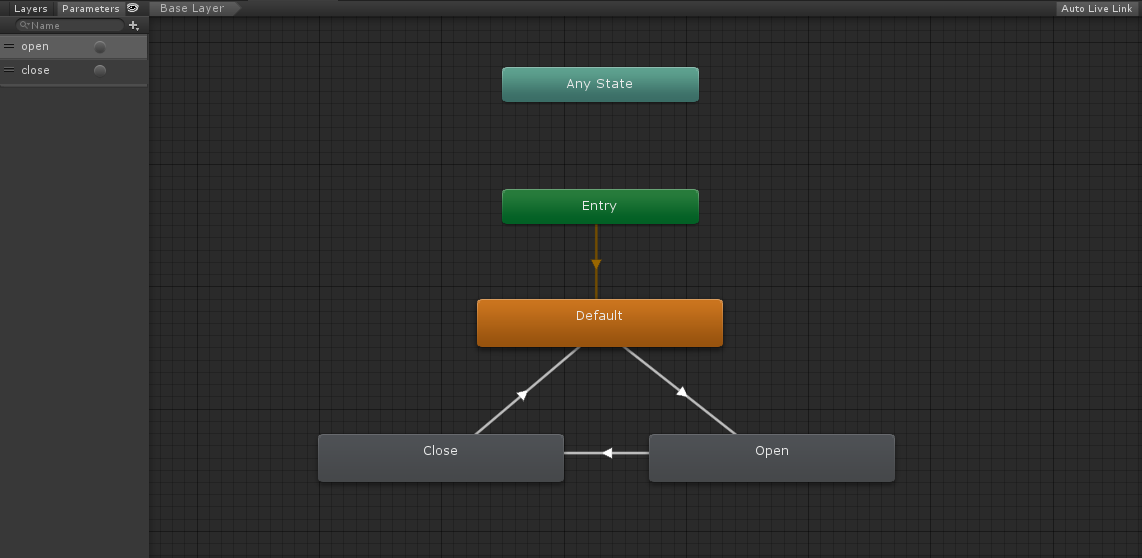
The Open and Close nodes of the animation have the same animation clip, however the speed of the close node is set to -1, this plays the clip backwards and closes the door. The transitions between nodes are controlled by the triggers in the top left (“open” transitions between Default and Open and “close” transitions between Open and Close). Since triggers are only used once (they are reset when their transition is triggered) the animations are only played once. The doors are also limited by their transitions, so a door that is already closed (in the Default state) will never have the Close animation played. This gives me a simple door that I can trigger by setting the parameters on the animation controller. Next, I need to make the switches and set the triggers on the door when the switch is pressed.
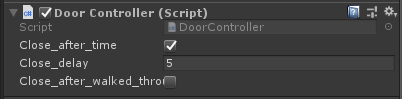
I also setup the ability for different doors on my script. If both the booleans shown above are false, then the door will never close, giving the opportunity to open a pathway for the player forever. If the close after time boolean is set then the door will close after the amount of time specified by close delay. If the close after walked through boolean is set, then a trigger will decide when to close the door. The close after walked through boolean will override close after time.
Switches
This is the basic setup for my switch. The larger collider is a trigger which when the player attacks inside the trigger, the button will be pressed; eventually this is how the cutscene will be called, but for now I will just click the button. The Animation Controller for the switch is exactly the same setup as the door, but with different animations and different trigger names. This will allow me have the switch pressed until the door is closed, then it can be released and able to be pressed again.
public void Click()
{
    clicked = true;
    switch_animator.SetTrigger("clicked");
}

void Release()
{
    clicked = false;
    switch_animator.SetTrigger("released");
}
These are the two functions that press and release the switch by, simply setting the triggers on the animator. The code also sets a boolean called “clicked” which ensures that the button cannot be clicked again if it has already been clicked.
if (Input.GetButtonDown("LeftAttack") &&
    player_in_range &&
    !clicked &&
    target.GetComponent<Animator>().GetCurrentAnimatorStateInfo(0).IsName("Default"))
{
    Click();
    target.Open();
}

if (clicked &&
    target.GetComponent<Animator>().GetCurrentAnimatorStateInfo(0).IsName("Close"))
{
    Release();
}
This is where the input is actually detected for the switch to be pressed. The switch is triggered by the player pressing leftAttack (X) however the player also needs to be inside the trigger, the button cannot be clicked and the door has to be closed. The second if statement in this code releases the button when the door closes, this enables the player to press the button multiple times. I’ve added this because if the player runs back through the door before it closes, they have no way of getting back through without the button releasing.
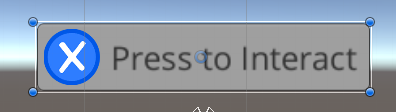
Switch UI
Legend of Zelda: Breath of the Wild has some UI to indicate to the player what to do. I’m going to add this into my project by having a “Press X” UI come up when the player enters the switch trigger. The UI looks like this:
I will change the alpha value based on whether the player is inside the trigger. I also want the UI to fade in and out, instead of just appearing. This is the code I setup to do this:
if (show_ui && interact_UI.alpha != 2)
{
    float new_alpha = Mathf.Lerp(interact_UI.alpha, 2, 0.1f);

    if (new_alpha > 1.95f)
    {
        new_alpha = 2;
    }

    interact_UI.alpha = new_alpha;
}
else if (!show_ui && interact_UI.alpha != 0)
{
    float new_alpha = Mathf.Lerp(interact_UI.alpha, 0, 0.1f);

    if (new_alpha < 0.05f)
    {
        new_alpha = 0;
    }

    interact_UI.alpha = new_alpha;
}
I have put this code in with the rest of the switch logic and the alpha is updated every update. The show ui boolean is updated in OnTriggetEnter and OnTriggerExit so the UI is shown when the player is inside the trigger. The boolean is also set to false when the X button is pressed, since the player doesn’t need to know the information anymore.
Cutscene
I have setup the cutscenes to have five different states, these are represented in the enum below:
public enum CutsceneState
{
    NONE,
    MOVE_TO_SWITCH,
    PRESS_SWITCH,
    MOVE_TO_DOOR,
    OPEN_DOOR,
    MOVE_BACK
}

public Transform player_target;
public Transform switch_camera_target;
public Transform door_camera_target;
public bool camera_return_to_start_position;
States: NONE - The cutscene is not running MOVE_TO_SWITCH - Teleport the camera from it’s starting position (around the player) to the switch_camera_target. Also teleport the player to the correct position for pressing the button. PRESS_SWITCH - Call the Call() function on the switch MOVE_TO_DOOR - Gradually move the camera towards the door_camera_target to be aligned for the door to open. OPEN_DOOR - Call the Open() function on the door MOVE_BACK - Move the camera back to the player and enable the player’s controls. The public transform variables are empty objects in the scene that tell the camera and the player where to move to. Doing a cutscene this way means that a switch can be positioned anywhere, and the transforms can be moved to accommodate the area around the switch, for example if the switch is in a corner, then the switch_camera_target can be moved to not be behind a wall and the camera will still move to the correct position and rotation. In my cutscene script, the Update function updates the cutscene based on the current state it’s in. A state will determine when to move onto the next state, for example the MOVE_TO_DOOR state will ensure the camera is in the correct position before moving to the OPEN_DOOR state. In the video below I demonstrate the doors, switches and cutscenes working correctly. The first door setup is closed after a certain amount of time (3 seconds), the second closes when you walk through it and the third never closes. The switches also have two types, the first returns the camera to it’s original position after the cutscene, and the second returns the camera to behind the player.
Improvements
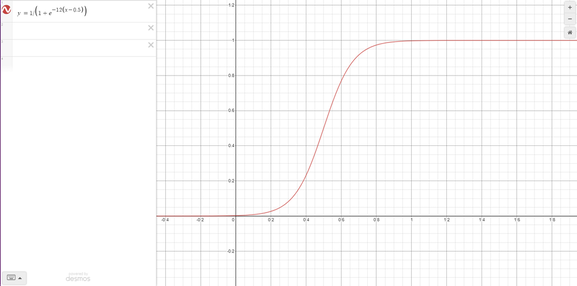
The feedback I have received from marking and my peers is that since the movement at the start and the end of the cutscene is quick, the opening of the door seems slow and could easily become boring to the player. My switch can also be triggered when the player is not facing it, this can be fixed by adding in a check to ensure that the angle between the switch and the forward direction of the player is in a certain range. I could also improve my cutscene by having the camera Lerp with a change in speed. For example an exponential equation like below (y = 1 / 1 + (e^(-12(x - 0.5)))) would make my camera move slow at the start, then fast and then slow at the end.